Solidity Debugger Pro for Visual Studio Code
Solidity Debugger Pro (sdbg) is a VS Code extension that adds feature-rich debugging capabilities for Solidity projects. It supports all EVM-compatible blockchains, allowing developers to easily debug smart contracts locally or on a forked node. Sdbg brings native debugging support for the popular Hardhat framework.
Sdbg is a feature-rich debugger that supports:
- Step Into, Step Over and Step Backwards
- Show the contents of Local and Storage variables, including mappings
- Show emitted events
- Show the Call Stack
- Show the contents of Stack, Memory and Calldata
- Debug Solidity smart contracts on a local node or on a forked environment
- Debug existing Hardhat projects
- Supports all EVM-compatible blockchains

Installation
Solidity Debugger Pro can be installed by using the Visual Studio Code Marketplace.
Alternatively, you can install it manually using a VSIX file available from our GitHub Release page.
Solidity Debugger Pro should work without any configuration on the following environments:
| Operating System | CPU Architecture | Status |
|---|---|---|
| macOS | x64 M1 | ✔ |
| Linux | x64 | ✔ |
| Windows | x64 | ✔ |
Basic Tutorial
The purpose of this section is to get you up and running with the Solidity debugger by walking through a very basic example. It is most suitable for beginners who are new to either Solidity or Sdbg.
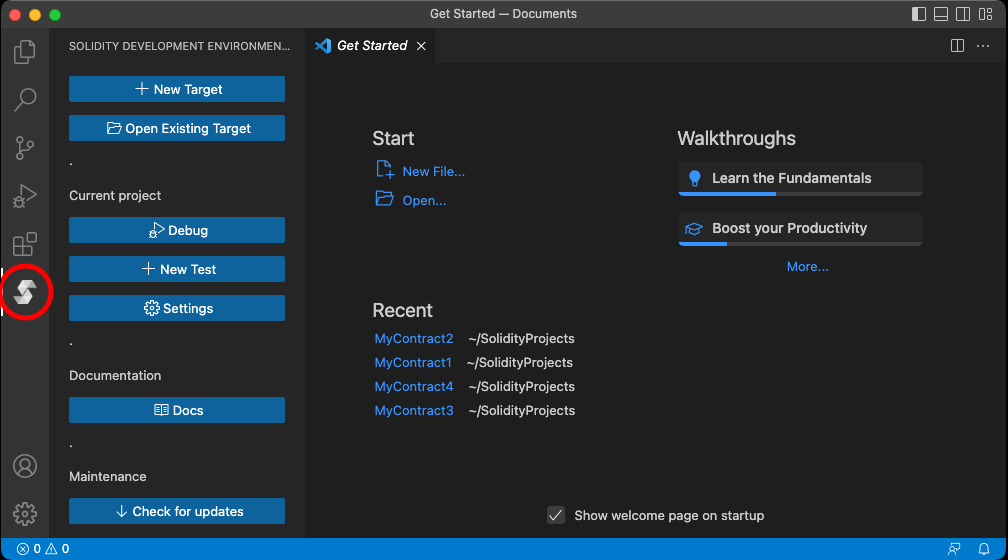
To get started, open the Sdbg menu by clicking on its sidebar icon:
Create Debug Target from Example
Click the New Target button. A menu will appear that will allow you to create a new debug target. Type a name for your debug target, or just leave the default name provided. In the screenshots below, the default name is "MyContract3".
Select Create from example and click Next.

The menu will expand, allowing you to select an example project to start from.
Select Empty Contract.
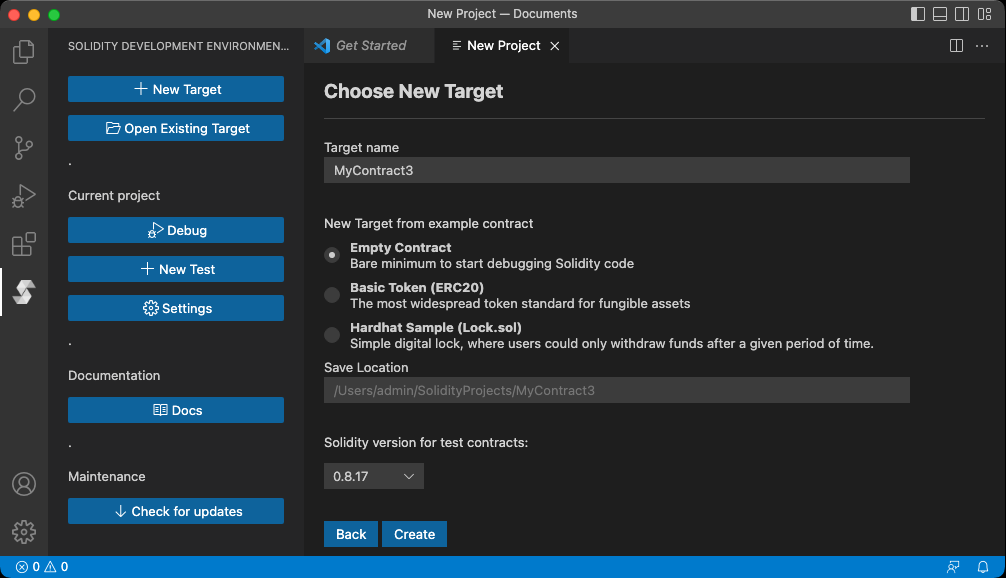
Save Location is the filesystem path where the project will be created. If you do not supply a path, the suggested default will be used. In the screenshot below, that would be /Users/admin/SolidityProjects/MyContract3.
Click Create when you are done.
Starting the Debugger
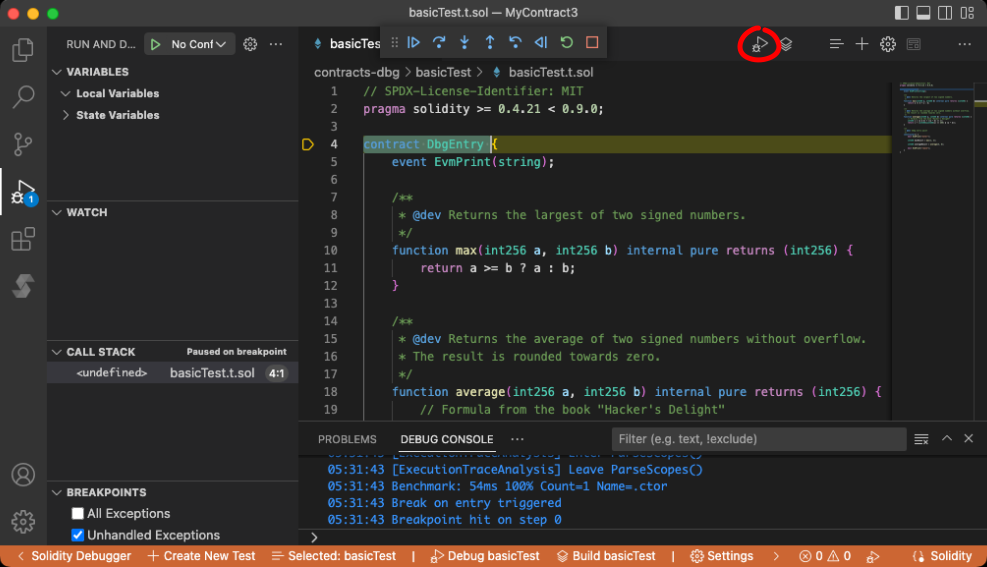
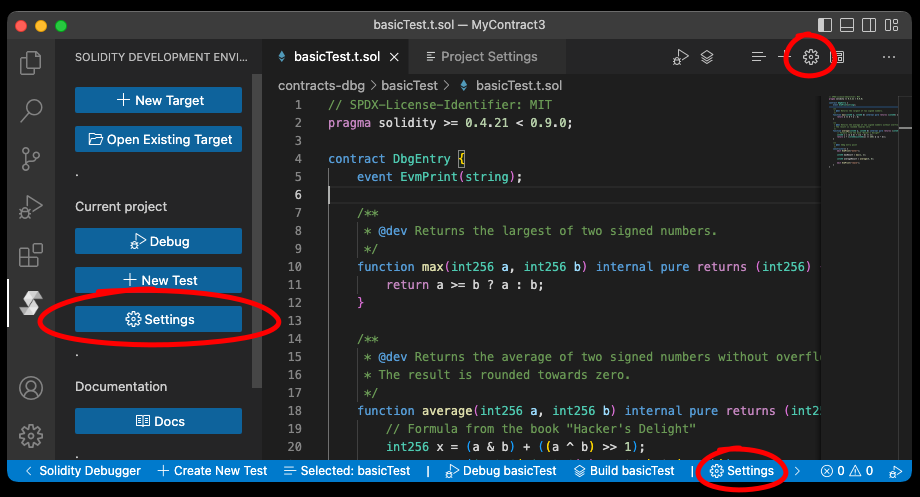
Press the Debug button on the top toolbar. A menu will appear asking which Test you would like to debug. In this example there is only one Test, basicTest.t.sol. Select basicTest and the debugger will start.
Execution will begin and automatically break on line 4 where the test contract begins. This behavior is called Break-on-Entry. You can disable Break-on-Entry in the Project Settings window. You can now step through the execution of the contract.
Basic Tutorial
The purpose of this section is to get you up and running with the Solidity debugger by walking through a very basic example. It is most suitable for beginners who are new to either Solidity or Sdbg.
To get started, open the Sdbg menu by clicking on its sidebar icon:
Create Debug Target from Example
Click the New Target button. A menu will appear that will allow you to create a new debug target. Type a name for your debug target, or just leave the default name provided. In the screenshots below, the default name is "MyContract3".
Select Create from example and click Next.
The menu will expand, allowing you to select an example project to start from.
Select Empty Contract.
Save Location is the filesystem path where the project will be created. If you do not supply a path, the suggested default will be used. In the screenshot below, that would be /Users/admin/SolidityProjects/MyContract3.
Click Create when you are done.
Starting the Debugger
Press the Debug button on the top toolbar. A menu will appear asking which Test you would like to debug. In this example there is only one Test, basicTest.t.sol. Select basicTest and the debugger will start.
Execution will begin and automatically break on line 4 where the test contract begins. This behavior is called Break-on-Entry. You can disable Break-on-Entry in the Project Settings window. You can now step through the execution of the contract.
File Structure of an Sdbg Debug-Target
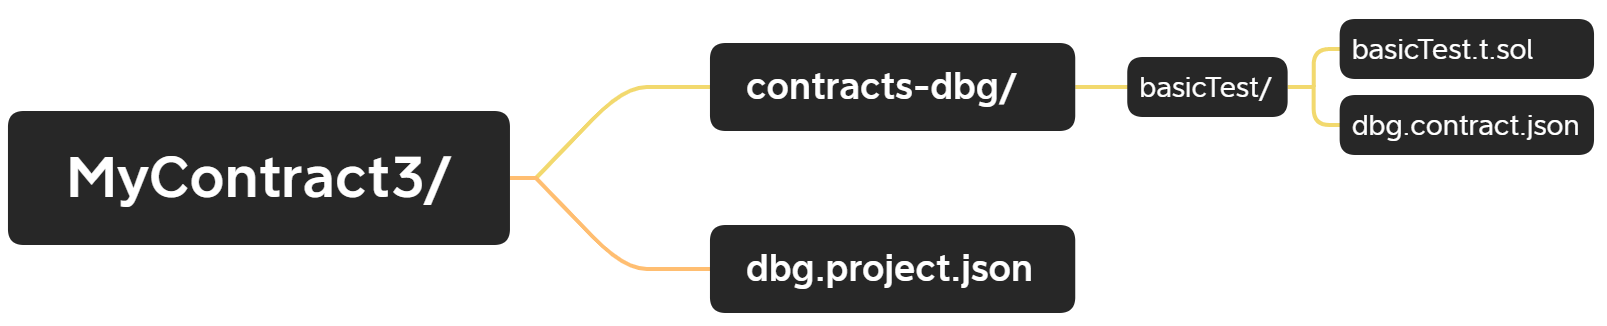
MyContract3/ is the root-directory of the MyContract3 debug-target. A debug-target is host to one or more test-contracts.
MyContract3/contracts-dbg/basicTest/ is a test-contract directory. Each test contract must be placed in its own directory.
MyContract3/contracts-dbg/basicTest/basicTest.t.sol is the main Solidity file for the test-contract basicTest.
MyContract3/contracts-dbg/basicTest/dbg.contract.json is the Sdbg configuration file for basicTest. See Settings Window.
MyContract3/dbg.project.json is the global configuration file. It contains default settings for all test contracts. See the discussion about (any) in Settings Window.
Adding Another Test-Contract
Click on either button to add a new test. You will be asked to provide a name for the new test. After that, the following files will be created:
contracts-dbg/TESTNAME/ - the test contract directory. Each test must have its own directory.
contracts-dbg/TESTNAME/TESTNAME.t.sol - the main solidity file for the test.
contracts-dbg/TESTNAME/dbg.contract.json - sdbg config file for the test.

The Settings Window
The settings window is a graphical frontend for dbg.project.json and dbg.contract.json. It lets you configure the behaviors of the Solidity compiler and debugger.
How to Open the Settings Window
There are three ways to open the settings window:
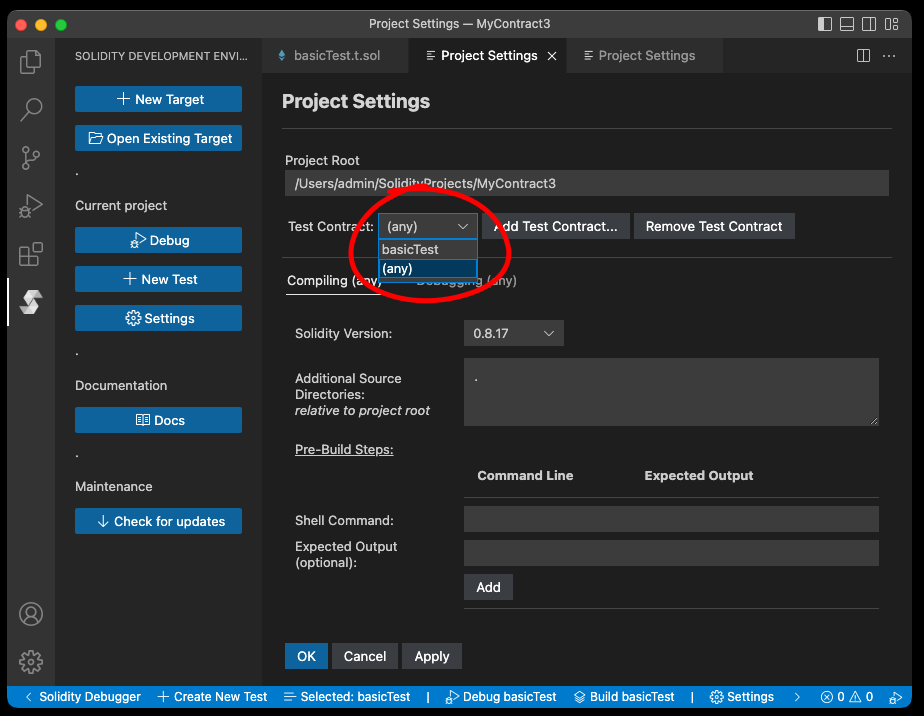
Test-Contract Selection
Settings can be changed for a particular test-contract, or they can be changed globally by selecting (any). Making changes to (any) sets global defaults that affect all tests. However, individual tests may override the global defaults with their own values.
Changes made to (any) are stored in dbg.project.json. Changes made to any other test are stored in contracts-dbg/TEST-NAME/dbg.contract.json
Compiler Settings
| Setting | What It Does |
|---|---|
| Solidity Version | Compiler version to use when compiling the selected test |
| Additional Source Directories | Additional import paths in case you need to import source files that reside in another directory. |
| Pre-Build Steps | Shell commands to run before compiling the test contract |
Debugger Settings
| Setting | What It Does |
|---|---|
| Break on Entry | Debugger will automatically stop at the beginning of the test contract |
| Show Storage Access (Verbose) | Verbose print all access to contract storage |
| Entry Point | Legacy value, leave it as-is |
| Forking→Enabled | You can start an instance of the debugger that forks another Ethereum node. This means that it will simulate having the same state as that node, but it will work as a local development network. That way you can interact with deployed protocols and test complex interactions locally |
| Forking→Ethereum RPC URL | URL of an Ethereum RPC node. For example: "https://eth-mainnet.alchemyapi.io/v2/KEY" |
| Forking→Block Number | The debugger will by default fork from the most recent block. However, if the provided URL points to an archive node you can also fork a past state |
| Hardhat Integration→ Import Debug Symbols from Hardhat Project | When enabled, the debugger will import symbols from the artifacts folder of a Hardhat project |
| Hardhat Integration→ Hardhat Project Root Directory | |
| Pre-Debug Steps | Shell commands to execute after compiling the test contract, but before the debugging session begins |
Debugging a sample Hardhat Project
Quick Start
First, make sure you have hardhat installed. If you do not already, you can install it from npm:
npm install --save-dev hardhat
Then initialize a new sample Typescript hardhat project:
npx hardhat
Choose 'Create a Typescript project.'
$ npx hardhat
'888 888 888 888 888
888 888 888 888 888
888 888 888 888 888
8888888888 8888b. 888d888 .d88888 88888b. 8888b. 888888
888 888 "88b 888P" d88" 888 888 "88b "88b 888
888 888 .d888888 888 888 888 888 888 .d888888 888
888 888 888 888 888 Y88b 888 888 888 888 888 Y88b.
888 888 "Y888888 888 "Y88888 888 888 "Y888888 "Y888'
👷 Welcome to Hardhat v2.9.9 👷
? What do you want to do? …
Create a JavaScript project
❯ Create a TypeScript project
Create an empty hardhat.config.js
Quit
Next, compile it by running:
npx hardhat compile
The compiled artifacts will be saved in the artifacts/ directory by default. This directory also contains debug symbols that the solidity debugger relies upon.
Debugging Your Hardhat Project
Open your project folder in Visual Studio Code, then access the Solidity Debugger menu from the left sidebar. Click on New Target and then on Create from currently-open Hardhat project. Click Next and then Create.
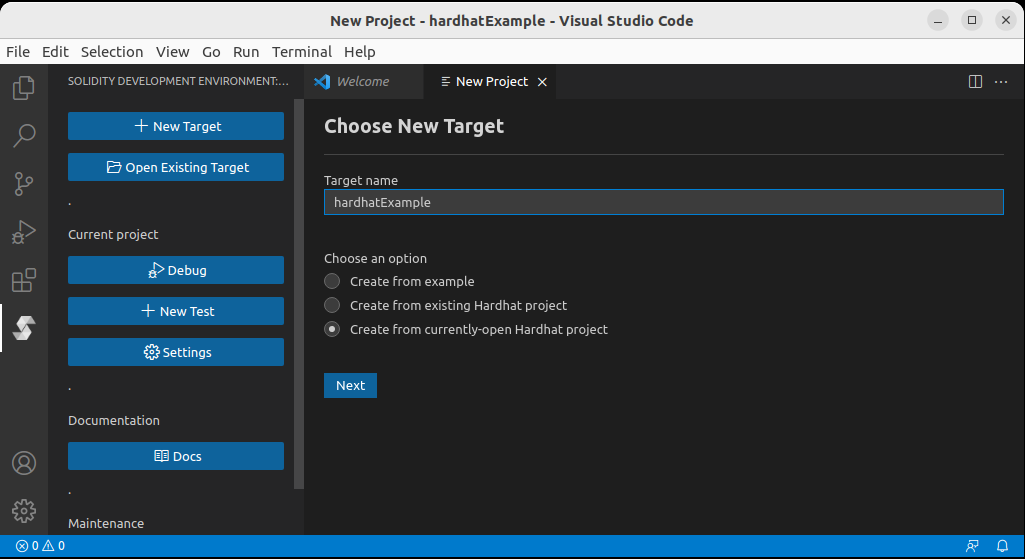
A Solidity Debugger Test will be created and opened:
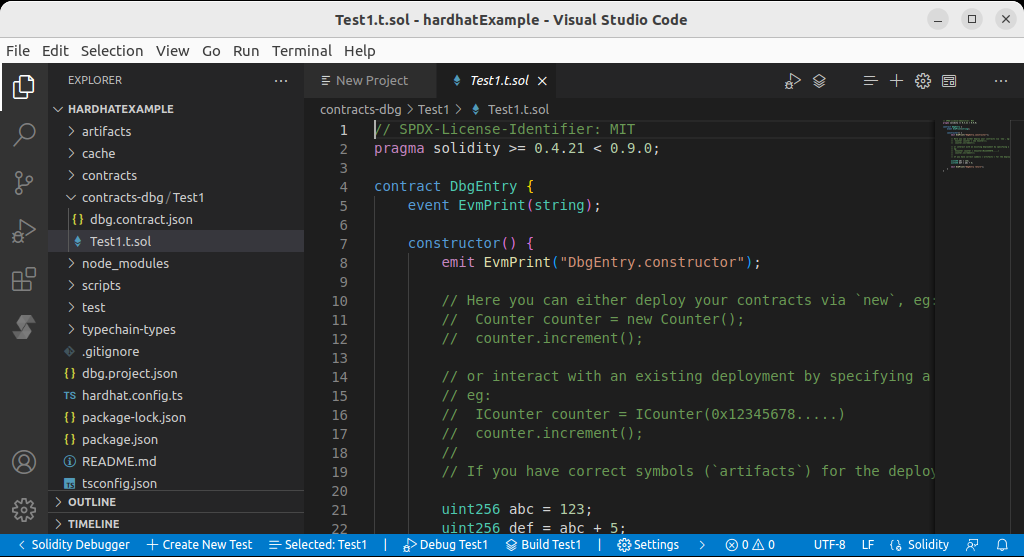
The solidity debugger is not capable of debugging contracts directly, therefore, it uses .t.sol files as entry points.
In this case, Test1.t.sol serves as the debugger's entry point. If we put a breakpoint on line 8 in Test1.t.sol and then press the Debug button we will be able to debug the test contract. However, we are actually interested in debugging Lock.sol.
One way to go about it is to import Lock.sol from Test1.t.sol and then deploy the Lock contract from inside the test.
To do this, replace the content of Test1.t.sol with the following code:
// SPDX-License-Identifier: MIT
pragma solidity >= 0.4.21 < 0.9.0;
import "contracts/Lock.sol";

contract DbgEntry {
    constructor() {
        Lock lock = new Lock(block.timestamp + 100);
    }
}
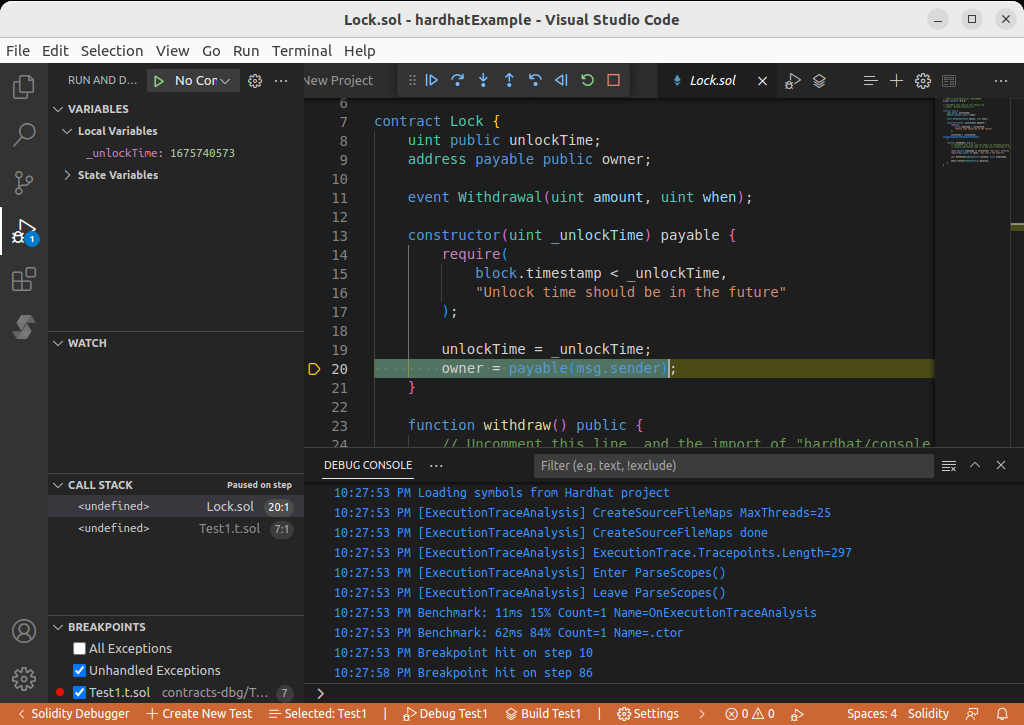
Put a breakpoint on Lock lock = new Lock(block.timestamp + 100); and click the Debug button. When the breakpoint hits, use Step Into to watch Lock.sol constructor in action:
Depositing ETH into the Lock Contract
The lock contract is meant to receive ETH and to hold it until a future time. The owner could then call withdraw() to get the ETH back from the contract. Therefore the first step in testing Lock.sol is to deposit ETH into the contract:
// SPDX-License-Identifier: MIT
pragma solidity >= 0.4.21 < 0.9.0;
import "contracts/Lock.sol";

contract DbgEntry {
    event EvmSetBalance(address, uint256);
    constructor() {
        emit EvmSetBalance(address(this), 1000);
        Lock lock = new Lock{value: 100}(block.timestamp + 100);
    }
}
EvmSetBalance is a cheat-code that instructs the debugger to change the balance of an address. We use it to change our own balance to 1000, so that we would have enough balance to make a deposit. We then deploy Lock with an initial deposit of 100.
Set a breakpoint on the line where a new Lock is created, then click Debug and use Step Into to watch the lock being initialized with a value of 100.
Withdrawing ETH from the Lock Contract
The owner of the contract can call withdraw() to get the money back. However, if we simply try calling withdraw() from our Test, our transaction would get reverted because Lock's unlock time is set to a time in the future.
Therefore, if we want withdraw() to succeed during our test, we need to somehow move block.timestamp into the future. We can do that using the EvmSetBlockTimestamp cheat code:
// SPDX-License-Identifier: MIT
pragma solidity >= 0.4.21 < 0.9.0;
import "contracts/Lock.sol";

contract DbgEntry {
    event EvmSetBalance(address, uint256);
    event EvmSetBlockTimestamp(uint256 newTimeStamp);
    event EvmPrint(string);
    event EvmPrint(address);
    event EvmPrint(uint256);
    constructor() {
        emit EvmSetBalance(address(this), 1000);
        Lock lock = new Lock{value: 100}(block.timestamp + 100);

        emit EvmSetBlockTimestamp(block.timestamp + 101);

        emit EvmPrint("Balance before:");
        emit EvmPrint(address(this).balance);

        lock.withdraw();

        emit EvmPrint("Balance after:");
        emit EvmPrint(address(this).balance);
    }
}
Now that block.timestamp is set past the unlock time, we can step into withdraw() and observe its successful completion.

Debugging a sample Hardhat Project
Quick Start
First, make sure you have hardhat installed. If you do not already, you can install it from npm:
npm install --save-dev hardhat
Then initialize a new sample Typescript hardhat project:
npx hardhat
Choose 'Create a Typescript project.'
$ npx hardhat
'888 888 888 888 888
888 888 888 888 888
888 888 888 888 888
8888888888 8888b. 888d888 .d88888 88888b. 8888b. 888888
888 888 "88b 888P" d88" 888 888 "88b "88b 888
888 888 .d888888 888 888 888 888 888 .d888888 888
888 888 888 888 888 Y88b 888 888 888 888 888 Y88b.
888 888 "Y888888 888 "Y88888 888 888 "Y888888 "Y888'
👷 Welcome to Hardhat v2.9.9 👷
? What do you want to do? …
Create a JavaScript project
❯ Create a TypeScript project
Create an empty hardhat.config.js
Quit
Next, compile it by running:
npx hardhat compile
The compiled artifacts will be saved in the artifacts/ directory by default. This directory also contains debug symbols that the solidity debugger relies upon.
Debugging Your Hardhat Project
Open your project folder in Visual Studio Code, then access the Solidity Debugger menu from the left sidebar. Click on New Target and then on Create from currently-open Hardhat project. Click Next and then Create.
A Solidity Debugger Test will be created and opened:
The solidity debugger is not capable of debugging contracts directly, therefore, it uses .t.sol files as entry points.
In this case, Test1.t.sol serves as the debugger's entry point. If we put a breakpoint on line 8 in Test1.t.sol and then press the Debug button we will be able to debug the test contract. However, we are actually interested in debugging Lock.sol.
One way to go about it is to import Lock.sol from Test1.t.sol and then deploy the Lock contract from inside the test.
To do this, replace the content of Test1.t.sol with the following code:
// SPDX-License-Identifier: MIT
pragma solidity >= 0.4.21 < 0.9.0;
import "contracts/Lock.sol";

contract DbgEntry {
    constructor() {
        Lock lock = new Lock(block.timestamp + 100);
    }
}
Put a breakpoint on Lock lock = new Lock(block.timestamp + 100); and click the Debug button. When the breakpoint hits, use Step Into to watch Lock.sol constructor in action:
Depositing ETH into the Lock Contract
The lock contract is meant to receive ETH and to hold it until a future time. The owner could then call withdraw() to get the ETH back from the contract. Therefore the first step in testing Lock.sol is to deposit ETH into the contract:
// SPDX-License-Identifier: MIT
pragma solidity >= 0.4.21 < 0.9.0;
import "contracts/Lock.sol";

contract DbgEntry {
    event EvmSetBalance(address, uint256);
    constructor() {
        emit EvmSetBalance(address(this), 1000);
        Lock lock = new Lock{value: 100}(block.timestamp + 100);
    }
}
EvmSetBalance is a cheat-code that instructs the debugger to change the balance of an address. We use it to change our own balance to 1000, so that we would have enough balance to make a deposit. We then deploy Lock with an initial deposit of 100.
Set a breakpoint on the line where a new Lock is created, then click Debug and use Step Into to watch the lock being initialized with a value of 100.
Withdrawing ETH from the Lock Contract
The owner of the contract can call withdraw() to get the money back. However, if we simply try calling withdraw() from our Test, our transaction would get reverted because Lock's unlock time is set to a time in the future.
Therefore, if we want withdraw() to succeed during our test, we need to somehow move block.timestamp into the future. We can do that using the EvmSetBlockTimestamp cheat code:
// SPDX-License-Identifier: MIT
pragma solidity >= 0.4.21 < 0.9.0;
import "contracts/Lock.sol";

contract DbgEntry {
    event EvmSetBalance(address, uint256);
    event EvmSetBlockTimestamp(uint256 newTimeStamp);
    event EvmPrint(string);
    event EvmPrint(address);
    event EvmPrint(uint256);
    constructor() {
        emit EvmSetBalance(address(this), 1000);
        Lock lock = new Lock{value: 100}(block.timestamp + 100);

        emit EvmSetBlockTimestamp(block.timestamp + 101);

        emit EvmPrint("Balance before:");
        emit EvmPrint(address(this).balance);

        lock.withdraw();

        emit EvmPrint("Balance after:");
        emit EvmPrint(address(this).balance);
    }
}
Now that block.timestamp is set past the unlock time, we can step into withdraw() and observe its successful completion.
Debugging in a Forked Environment
In Part 1 we deployed the Lock contract directly from Test1.t.sol. However, in many real-world situations it is more convenient to deploy our contracts using a deploy script. The Hardhat demo project comes with an example of how to do this in scripts/deploy.ts:
import { ethers } from "hardhat";

async function main() {
  const currentTimestampInSeconds = Math.round(Date.now() / 1000);
  const ONE_YEAR_IN_SECS = 365 * 24 * 60 * 60;
  const unlockTime = currentTimestampInSeconds + ONE_YEAR_IN_SECS;

  const lockedAmount = ethers.utils.parseEther("1");

  const Lock = await ethers.getContractFactory("Lock");
  const lock = await Lock.deploy(unlockTime, { value: lockedAmount });

  await lock.deployed();

  console.log(`Lock with 1 ETH and unlock timestamp ${unlockTime} deployed to ${lock.address}`);
}

// We recommend this pattern to be able to use async/await everywhere
// and properly handle errors.
main().catch((error) => {
  console.error(error);
  process.exitCode = 1;
});
Suppose we wanted to debug an instance of Lock that has already been deployed. We could do that by following these steps:
Run a Hardhat Network Node
$ npx hardhat node
Started HTTP and WebSocket JSON-RPC server at http://127.0.0.1:8545/
Run Deploy Script
$ npx hardhat run scripts/deploy.ts --network localhost
Compiled 1 Solidity file successfully
Lock with 1 ETH and unlock timestamp 1707281396 deployed to 0x5FbDB2315678afecb367f032d93F642f64180aa3
Configure Debugger to Use Hardhat Node
Open the Settings Window and select the Test1 contract which we created in Part 1.
Then configure these settings under Debugging Test1:
| Setting | Value |
|---|---|
| Forking→Enabled | checked |
| Forking→Ethereum RPC URL | http://127.0.0.1:8545/ |
Click OK when you're done.
Modify Your Test Contract
Let's rewrite Test1.t.sol with the assumption that Lock is already deployed at address 0x5FbDB2315678afecb367f032d93F642f64180aa3:
// SPDX-License-Identifier: MIT
pragma solidity >= 0.4.21 < 0.9.0;
import "contracts/Lock.sol";

contract DbgEntry {
    constructor() {
        Lock lock = Lock(0x5FbDB2315678afecb367f032d93F642f64180aa3);
        address lockOwner = lock.owner();
        uint256 lockUnlockTime = lock.unlockTime();
        uint256 currentTime = block.timestamp;
    }
}
Put a breakpoint inside the test and click Debug. You should now be able to debug the deployed contract.

Calling lock.withdraw()
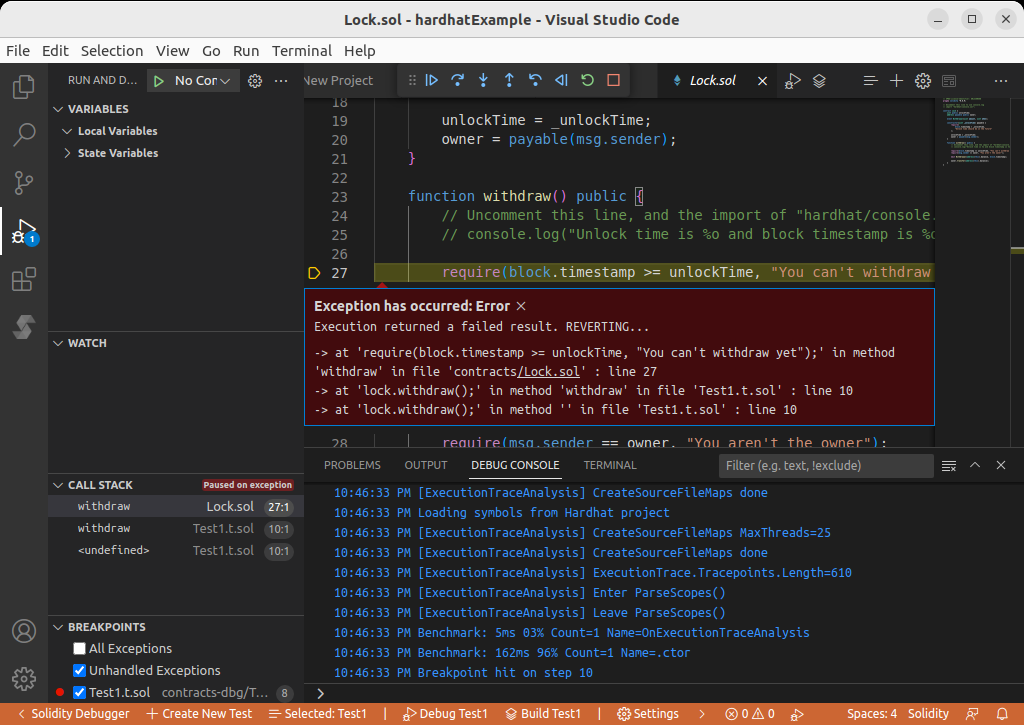
If we try calling lock.withdraw() from our test, our transaction would be reverted. This is because we fail to pass the two necessary conditions for a withdrawal:
- The current block's timestamp must be larger or equal to the unlock time. But the unlock time was set by
deploy.tsto be 1-year into the future:const ONE_YEAR_IN_SECS = 365 * 24 * 60 * 60; withdraw()can only be called by the owner of the contract, but our test contract is not the owner.
function withdraw() public {
    require(block.timestamp >= unlockTime, "You can't withdraw yet");
    require(msg.sender == owner, "You aren't the owner");
    emit Withdrawal(address(this).balance, block.timestamp);
    owner.transfer(address(this).balance);
}
Bypassing condition 1 can be achieved using EvmSetBlockTimestamp as we've done in Part 1.
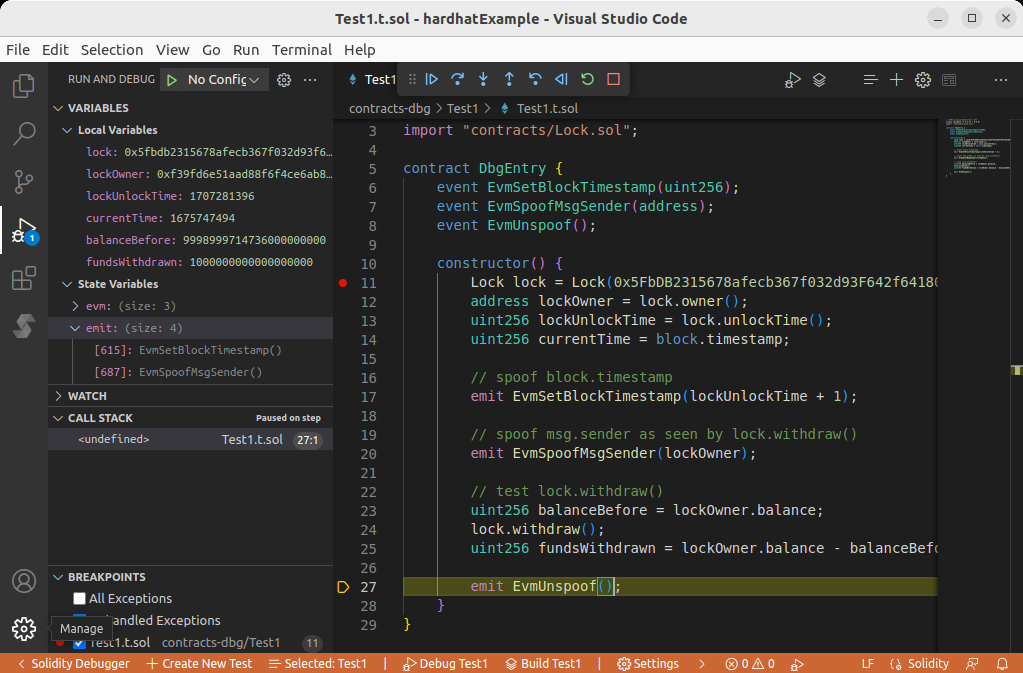
Bypassing condition 2 is possible using the cheat code EvmSpoofMsgSender, which instructs the debugger to set all subsequent calls' msg.sender to be the specified address.
// SPDX-License-Identifier: MIT
pragma solidity >= 0.4.21 < 0.9.0;
import "contracts/Lock.sol";

contract DbgEntry {
    event EvmSetBlockTimestamp(uint256);
    event EvmSpoofMsgSender(address);
    event EvmUnspoof();

    constructor() {
        Lock lock = Lock(0x5FbDB2315678afecb367f032d93F642f64180aa3);
        address lockOwner = lock.owner();
        uint256 lockUnlockTime = lock.unlockTime();
        uint256 currentTime = block.timestamp;

        // spoof block.timestamp
        emit EvmSetBlockTimestamp(lockUnlockTime + 1);

        // spoof msg.sender as seen by lock.withdraw()
        emit EvmSpoofMsgSender(lockOwner);

        // test lock.withdraw()
        uint256 balanceBefore = lockOwner.balance;
        lock.withdraw();
        uint256 fundsWithdrawn = lockOwner.balance - balanceBefore;

        emit EvmUnspoof();
    }
}
With both cheat codes in place we can call withdraw() and have it finish successfully.
Walkthrough: Debugging a Uniswap V3 Transaction on Mainnet
This short tutorial will walk you through the steps of debugging a Uniswap V3 transaction on Ethereum Mainnet. It requires access to a public Ethereum RPC endpoint which the debugger will fork the blockchain state from. You can find an RPC URL from Chainlist.
In this tutorial, we will write a test that will:
- Convert ETH to WETH using the WETH contract's
deposit()method - Swap WETH for DAI using Uniswap V3 protocol
- Use the debugger to step into Uniswap V3's code to observe its inner workings
All while using the actual up-to-date Ethereum mainnet state. Let's begin!
Clone Uniswap from GitHub
To call Uniswap we'll need its Solidity interface files. We can fetch these from the Uniswap/v3-periphery repository on GitHub.
$ git clone https://github.com/Uniswap/v3-periphery.git
$ cd v3-periphery
$ npm install       # install dependencies
In order to be able to step into the Uniswap code, we need to compile its contracts and generate an artifacts folder. The Solidity Debuger reads necessary metadata from these artifacts that helps it match deployed bytecode to source code. Run:
$ npx hardhat compile
Create a Debug Target for 'v3-periphery'
Open the v3-periphery folder in VS Code. Then, from the Solidity Debugger menu click New Target and select Create from currently-open Hardhat project.
Choose a Solidity compiler for the test contract you are about to create. Uniswap was written using Solidity 0.7.6, so that version is automatically selected. However, in this tutorial we will use the latest version. Select compiler version 0.8.17, then click Create.
Once target creation is complete, Test1.t.sol will automatically open in the editor.
Configure Forking
Open the Settings Window and select the Test1 contract, then change the following settings under Debugging Test1:
| Setting | Value |
|---|---|
| Forking→Enabled | enabled |
| Forking→Ethereum RPC URL | https://mainnet.infura.io/v3/YOUR-API-KEY |
You can get a URL for a free public node at chainlist.org.
Click OK when you are done.
Performing a Swap
Replace source code of Test1.t.sol with:
// SPDX-License-Identifier: MIT
pragma solidity >= 0.4.21 < 0.9.0;
import "contracts/interfaces/ISwapRouter.sol";
interface IERC20x {
function balanceOf(address account) external view returns (uint256);
function approve(address spender, uint256 amount) external returns (bool);
}
interface IWETHx is IERC20x {
function deposit() external payable;
}
contract DbgEntry {
ISwapRouter public constant uniswapRouter = ISwapRouter(0xE592427A0AEce92De3Edee1F18E0157C05861564);
IWETHx private constant WETH = IWETHx(0xC02aaA39b223FE8D0A0e5C4F27eAD9083C756Cc2);
IERC20x DAI = IERC20x(0x6B175474E89094C44Da98b954EedeAC495271d0F);
// solidity debugger cheat code
event EvmSetBalance(address, uint256);
constructor() {
emit EvmSetBalance(address(this), 1000 ether);
// convert ETH to WETH
WETH.deposit{value: 2 ether}();
WETH.approve(address(uniswapRouter), type(uint256).max);
// get balances before swap
uint256 startBalanceETH = address(this).balance;
uint256 startBalanceDAI = DAI.balanceOf(address(this));
uint256 startBalanceWETH = WETH.balanceOf(address(this));
// swap WETH for DAI
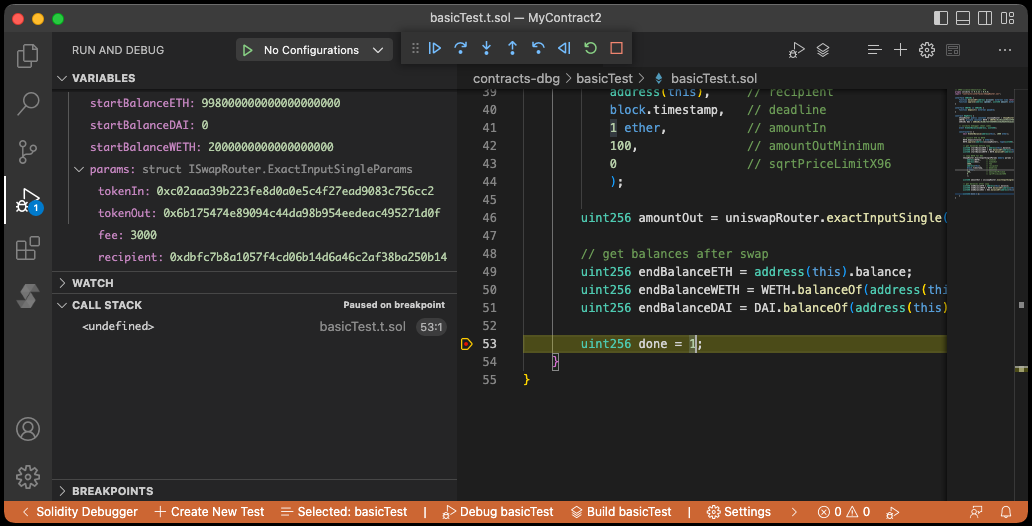
ISwapRouter.ExactInputSingleParams memory params = ISwapRouter.ExactInputSingleParams(
address(WETH), // tokenIn
address(DAI), // tokenOut
3000, // fee
address(this), // recipient
block.timestamp, // deadline
1 ether, // amountIn
100, // amountOutMinimum
0 // sqrtPriceLimitX96
);
uint256 amountOut = uniswapRouter.exactInputSingle(params);
// get balances after swap
uint256 endBalanceETH = address(this).balance;
uint256 endBalanceWETH = WETH.balanceOf(address(this));
uint256 endBalanceDAI = DAI.balanceOf(address(this));
uint256 done = 1;
}
}
Put a breakpoint on the first line of the constructor (emit EvmSetBalance(address(this), 1000 ether);) and click the Debug button. You should be able to step through the transaction until it is done.
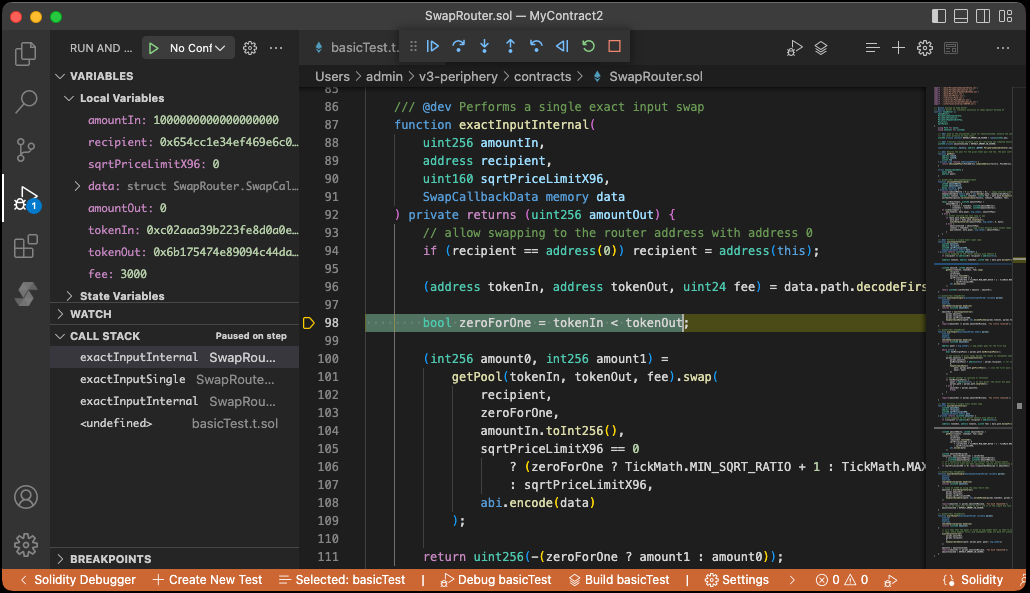
Stepping into Uniswap
Put a breakpoint on the call to uniswapRouter.exactInputSingle(params) and start the debugger. When the breakpoint hits, try stepping into the call and you will find that you're able to step into Uniswap's internals!
EVM Cheat Codes Reference
// Print value to the debugger output window
event EvmPrint(string value);
event EvmPrint(address value);
event EvmPrint(uint256 value);

// Sets all subsequent outputs of the ADDRESS opcode to be the specified address
event EvmSpoofAddressOpcode(address addr);

// Set tx.origin
event EvmSpoofOriginOpcode(address addr);

// Sets all subsequent outputs of the CALLER opcode to be the specified address
event EvmSpoofCallerOpcode(address addr);

// Sets all subsequent calls' msg.sender to be the specified address
event EvmSpoofMsgSender(address addr);

// Resets the effects of EvmSpoof*()
event EvmUnspoof();

// Sets the value of block.timestamp
// Call "emit EvmSetBlockTimestamp(0);" to revert back to the original
event EvmSetBlockTimestamp(uint256 newTimeStamp);

// Sets the value of block.number
// Call "emit EvmSetBlockNumber(0);" to revert back to the original
event EvmSetBlockNumber(uint256 value);

// Sets the value of block.difficulty
// Call "emit EvmSetBlockDifficulty(0);" to revert back to the original
event EvmSetBlockDifficulty(uint256 value);

// Sets the value of block.chainid
// Call "emit EvmSetChainId(0);" to revert back to the original
event EvmSetChainId(uint256 value);

// Sets the ETH balance of an address
event EvmSetBalance(address addr, uint256 ethBalance);

// Programmatically enable or disable forking to an external Ethereum RPC node
event EvmSetForkUrl(string url);
event EvmSetForkBlockNumber(uint256 blockNumber);
event EvmStartFork();
event EvmStopFork();